Compose ConstraintLayout约束布局主要应用在构建复杂布局,避免使用Column、Row、Box多层嵌套,同时也能提高开发效率。
开始使用之前需要添加对ConstraintLayout的依赖:
1 implementation 'androidx.constraintlayout:constraintlayout-compose:1.0.0-alpha03'
需要注意的 :截止本文发稿,Compose和Constraintlayout都还没有到稳定版本,所以对相关库的依赖一定都要更新到最新版本(或者相适配版本),不然可能存在不兼容问题。
查看ConstraintLayout的最新地址
在View系统的ConstraintLayout在xml布局中,需要通过id进行相关引用,在Compose也是类似的。通过createRefs函数或createRef函数为不同的View预定一个引用。
1
2
3
4
5
6
7
@Composable fun learnConstraintLayout () ConstraintLayout() { val (image,name,desc)=createRefs() } }
将通过constrainAs函数将引用与View绑定,相当于给View赋值了一个id。另外,constarinAs有时在编写代码并不能自动提示,需要自己手刃代码哦。
1
2
3
4
5
6
7
8
9
10
11
12
13
14
15
@Composable fun learnConstraintLayout () ConstraintLayout() { val (image,name,desc)=createRefs() Image(painter = painterResource(id = puppy.avatar), contentDescription = "dog avatar" , modifier = Modifier .constrainAs(avatar) {} .size(100. dp) .clip(shape = RoundedCornerShape(5 )), contentScale = ContentScale.Crop) } }
通过linkTo函数将view与其他view或者parent约束。这里的parent指的就是ConstraintLayout本身。
1
2
3
4
5
6
7
8
9
10
11
12
13
14
15
16
17
18
19
20
21
@Composable fun learnConstraintLayout () ConstraintLayout() { val (image,name,desc)=createRefs() Image(painter = painterResource(id = puppy.avatar), contentDescription = "dog avatar" , modifier = Modifier .constrainAs(avatar) { top.linkTo(parent.top) start.linkTo(parent.start) end.linkTo(parent.end) bottom.linkTo(parent.bottom) } .size(100. dp) .clip(shape = RoundedCornerShape(5 )), contentScale = ContentScale.Crop) } }
constrainAs函数中的start、top、end、bottom分别代表view的左、上、右、下四条边,linkTo表示相互作用。例如代码中的top.linkTo(parent.top)表示Image的顶边和ConstraintLayout的顶边对齐,和view系统中的layout_constraintTop_toTopOf="parent"是一致。接下来再增加两个Text。
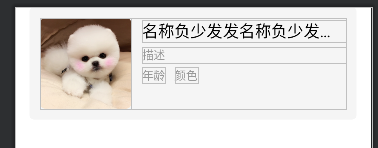
1
2
3
4
5
6
7
8
9
10
11
12
13
14
15
16
17
18
19
20
21
22
23
24
25
26
27
28
29
30
31
32
33
34
35
36
37
38
39
40
41
42
43
44
45
46
47
48
49
@Composable fun learnConstraintLayout () ConstraintLayout() { val (imageRef, nameRef, descRef) = createRefs() Image(painter = painterResource(id = R.mipmap.dog_avatar), contentDescription = "dog avatar" , modifier = Modifier .constrainAs(imageRef) { top.linkTo(parent.top) start.linkTo(parent.start) bottom.linkTo(parent.bottom) } .size(100. dp) .clip(shape = RoundedCornerShape(5 )), contentScale = ContentScale.Crop) Text( text = "名称" , modifier = Modifier .constrainAs(nameRef) { top.linkTo(imageRef.top, 2. dp) start.linkTo(imageRef.end, 12. dp) end.linkTo(parent.end) width = Dimension.fillToConstraints } .fillMaxWidth(), fontSize = 18. sp, maxLines = 1 , textAlign = TextAlign.Left, overflow = TextOverflow.Ellipsis, ) Text(text = "描述" , modifier = Modifier .constrainAs(descRef) { top.linkTo(nameRef.bottom, 5. dp) start.linkTo(nameRef.start) end.linkTo(parent.end) width = Dimension.fillToConstraints } .fillMaxWidth(), maxLines = 1 , overflow = TextOverflow.Ellipsis, style = TextStyle(color = color999999, fontSize = 13. sp) ) } }
在上面代码中,在ConstrantLayout中创建了Image和两个Text组件。在Text的约束,通过start.linkTo(imageRef.end, 12.dp)约束条件,将nameRef Text位与Image的右边,并增加了12dp的margin。
注意到,给Text的宽度增加了width = Dimension.fillToConstraints约束,让Text文本过长时,不超出约束条件。
例如,默认情况下:
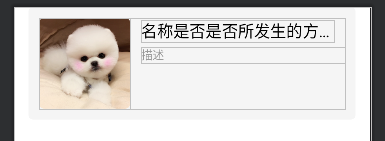
1 2 3 4 5 6 7 8 9 10 11 12 13 Text( text = "名称是否是否所发生的方法是否是否" , modifier = Modifier .constrainAs(nameRef) { top.linkTo(imageRef.top, 2. dp) start.linkTo(imageRef.end, 12. dp) }, fontSize = 18. sp, maxLines = 1 , textAlign = TextAlign.Left, overflow = TextOverflow.Ellipsis, )
通过效果图看到,Text文本过长时不仅超过了ConstraintLayout,还超出了屏幕。
将代码改成如下:
1
2
3
4
5
6
7
8
9
10
11
12
13
14
Text( text = "名称是否是否所发生的方法是否是否" , modifier = Modifier .constrainAs(nameRef) { top.linkTo(imageRef.top, 2. dp) start.linkTo(imageRef.end, 12. dp) end.linkTo(parent.end,12. dp) width=Dimension.fillToConstraints }, fontSize = 18. sp, maxLines = 1 , textAlign = TextAlign.Left, overflow = TextOverflow.Ellipsis, )
效果图:
Dimension取值如下:
fillToConstraints
preferredWrapContent
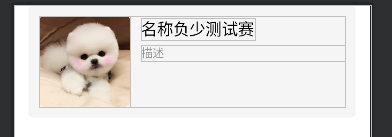
例如:小于约束所剩宽时:
1
2
3
4
5
6
7
8
9
10
11
12
Text( text = "名称负少测试赛" , modifier = Modifier .constrainAs(nameRef) { top.linkTo(imageRef.top, 2. dp) start.linkTo(imageRef.end, 12. dp) width=Dimension.preferredWrapContent }, fontSize = 18. sp, textAlign = TextAlign.Left, overflow = TextOverflow.Ellipsis, )
效果图:
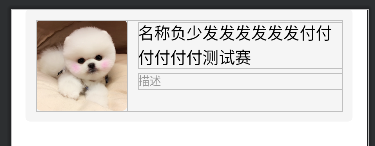
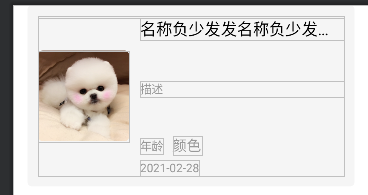
增加文本内容,增加右边与parent对齐。通过效果图,可见文本换行处理。
1
2
3
4
5
6
7
8
9
10
11
12
13
Text( text = "名称负少发发发发发发付付付付付付测试赛" , modifier = Modifier .constrainAs(nameRef) { top.linkTo(imageRef.top, 2. dp) start.linkTo(imageRef.end, 12. dp) end.linkTo(parent.end) width=Dimension.preferredWrapContent }, fontSize = 18. sp, textAlign = TextAlign.Left, overflow = TextOverflow.Ellipsis, )
效果图:
wrapContent
preferredValue
value
当然,Compose ConstraintLayout也提供居中对齐,centerTo、centerHorizontallyTo、centerVerticallyTo。
例如:再增加两个Text,使其水平居中对齐。
1
2
3
4
5
6
7
8
9
10
11
12
13
14
15
16
17
18
19
20
21
Text(text = "年龄" , modifier = Modifier .constrainAs(ageRef) { top.linkTo(descRef.bottom, 5. dp) start.linkTo(nameRef.start) }, maxLines = 1 , overflow = TextOverflow.Ellipsis, style = TextStyle(color = color999999, fontSize = 13. sp) ) Text(text = "颜色" , modifier = Modifier .constrainAs(colorRef) { start.linkTo(ageRef.end,10. dp) centerVerticallyTo(ageRef) width = Dimension.fillToConstraints }, maxLines = 1 , overflow = TextOverflow.Ellipsis, style = TextStyle(color = color999999, fontSize = 13. sp) )
效果图:
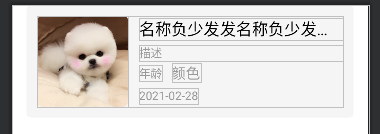
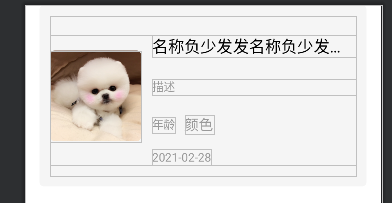
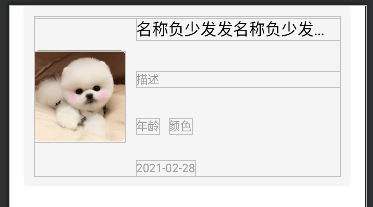
由于年龄和颜色有时为了突出显示,设置不同的大小和颜色,而时间Text想根据两者的底部处于最下的来对齐。此时就需要栅栏 。
1
2
3
4
5
6
7
8
9
10
11
val bottomBarrier=createBottomBarrier(ageRef,colorRef,margin = 5. dp)Text(text = "2021-02-28" , modifier = Modifier .constrainAs(timeRef) { start.linkTo(nameRef.start) top.linkTo(bottomBarrier) }, maxLines = 1 , overflow = TextOverflow.Ellipsis, style = TextStyle(color = color999999, fontSize = 13. sp) )
效果图:
当然,可以通过createStartBarrier()、createTopBarrier()、createEndBarrier()创建不同方向的栅栏。
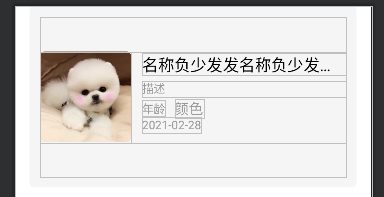
随着右侧文本的增加,可恶的项目经理有时要求垂直方向中间压缩,有时要求平均整个Constraintlayout的高度。这时候就需要链 出场了。通过createVerticalChain和createHorizontalChain创建垂直和水平方向的链。
1 createVerticalChain(nameRef,descRef,ageRef,timeRef,chainStyle = ChainStyle.Spread)
效果图:
**ChainStyle**的取值:
从效果图SpreadInside可以看到并不是很理想,这是因为一些上下相互约束条件没有设置好。例如调整后:
也可以通过createGuidelineFromBottom,一起相关类似的api来创建引导线 。引导线是不可见,起到View的对齐参考作用。
其实,整体使用下来的感受,Compose ConstraintLayout约束条件的使用和View系统的ConStraintLayout是一致,简单熟悉一下API基本可以上手。如果不熟悉View系统的ConStraintLayout,建议先阅读Constraintlayout 2.0:你们要的更新来了 。如果对一些API不存在或报错,建议查找官方文档 ,查看版本是否更新或者API更换或废弃。
另外:由于Compose已经优化深层布局嵌套,所以也就不存在使用Compose ConstraintLayout比多层嵌套使用Column和Row等等布局存在性能优势问题。只是更方便我们开发复杂布局,对齐边缘等。
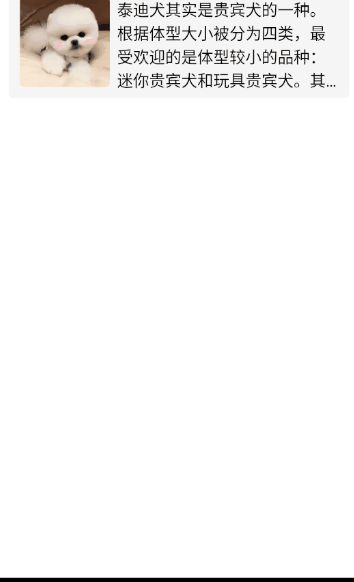
ConstraintSetConstraintSet主要说来做动画处理,一个ConstraintSet保存一个布局的约束状态,通过约束状态的切换,来实现同个布局状态切换效果。
效果图:
代码实现:
1
2
3
4
5
6
7
8
9
10
11
12
13
14
15
16
17
18
19
20
21
22
23
24
25
26
27
28
29
30
31
32
33
34
35
36
37
38
39
40
41
42
43
44
45
46
47
48
49
50
51
52
53
54
55
56
57
58
59
60
61
62
63
64
65
66
67
68
69
70
71
72
73
74
75
76
77
@Composable fun learnConstraintSet () val orientation = remember { mutableStateOf(1 )} ConstraintLayout( getConstraintLayout(orientation), Modifier .padding(16. dp, 0. dp, 16. dp, 0. dp) .background(color = colorEFEFEF, shape = RoundedCornerShape(5. dp)) .fillMaxWidth() .padding(12. dp, 12. dp, 12. dp, 12. dp) ) { Image( painter = painterResource(id = R.mipmap.dog_avatar), contentDescription = "效果图片" , modifier = Modifier .layoutId("imageRef" ) .fillMaxWidth() .clickable { if (orientation.value==0 ){ orientation.value=1 }else { orientation.value=0 } } .clip(shape = RoundedCornerShape(5 )), contentScale = ContentScale.FillWidth ) Text( text = "泰迪犬其实是贵宾犬的一种。根据体型大小被分为四类,最受欢迎的是体型较小的品种:迷你贵宾犬和玩具贵宾犬。其中玩具贵宾犬是体型最小的一种,个性好动、欢快、非常机警、聪明、喜欢外出、性格脾气好、适应力强。贵宾犬不脱毛,是极好的宠物犬。如果红色玩具贵宾犬不剃胡须和嘴边的毛可以长成动漫画里面泰迪熊的模样,所以红色(褐色)玩具贵宾犬又叫“泰迪" , modifier = Modifier.layoutId("titleRef" ), fontSize = 18. sp, textAlign = TextAlign.Left, overflow = TextOverflow.Ellipsis, maxLines =if (orientation.value==0 ) Int .MAX_VALUE else 4 ,) } } private fun getConstraintLayout (orientation:MutableState <Int >) return ConstraintSet { val imageRef= createRefFor("imageRef" ) val titleRef= createRefFor("titleRef" ) if (orientation.value==0 ){ constrain(imageRef){ start.linkTo(parent.start) end.linkTo(parent.end) top.linkTo(parent.top) } constrain(titleRef){ start.linkTo(imageRef.start) end.linkTo(imageRef.end) top.linkTo(imageRef.bottom,16. dp) width= Dimension.fillToConstraints } }else { constrain(imageRef){ start.linkTo(parent.start) top.linkTo(parent.top) width=Dimension.value(100. dp) height=Dimension.value(100. dp) } constrain(titleRef){ start.linkTo(imageRef.end,8. dp) top.linkTo(imageRef.top,2. dp) end.linkTo(parent.end) bottom.linkTo(imageRef.bottom,8. dp) width= Dimension.fillToConstraints height= Dimension.fillToConstraints } } } }
本文所有代码仓库地址
欢迎点赞+关注+评论三连击
【Github 】【掘金 】【博客 】